Hi Guys,
Today we will learn the concept of JMS adapter in SOA Suite.Oracle JCA Adapter for JMS (Oracle JMS Adapter), enables an Oracle BPEL process or an Oracle Mediator component to interact with JMS.While working with JMS adapter we can use either topics or queues.
Messages are exchanged through a queue via point to point interaction wheres as in topics the publish-subscribe model is being used i.e messages are sent to a topic and can be read by many subscribed clients.We will implement one usecase scenario in which our BPEL process will pick message from one jms queue and the same message will be published in another JMS queue.This scenario will demonstrate how to consume and publish messages in jms queue.Ofcourse, our queues would be present on weblogic application server.Also,knowledge about queues and connection factory by viewers is preasumed.
Before we start below are some prerequisites in order to implement this usecase:
1. Oracle JDeveloper 11G
2. Oracle SOA Suite 11G
3. Weblogic Server Up and running
I have done this tutorial using Oracle Soa Suite 11.1.1.6.0 , JDeveloper 11.1.1.6.0 and Weblogic Server 10.3.6.0.
Consume Message : The Consume Message option enables the adapter to consume (receive) inbound messages from a JMS destination.
Produce Message : enables the adapter to produce (send) outbound messages for a JMS destination.
Request/Reply : Oracle JMS Adapter supports both synchronous and asynchronous request reply interaction pattern.It is out of context from our tutorial perspective.
Lets start with the tutorial
1. We will use the same application "SOALabs" for this(refer Hello World BPEL Process) and create a new project in this application.First of all go to Files --> New. Then navigate to Projects under categories on left hand side and select SOA Project and click OK.

2. Window will ask you for project name.Give the project name as JMSLab and click next.

3. Select "Empty Composite" as composite template and finish.

4. Payload will be published in a JMS queue in a specific format.That format we will design using XML Schemas(XSD).For our application we will be using same schema both for consuming message from jms queue as well as producing message onto jms queue.Right click on xsd folder under project navigator and click New.

5. Select XML Schema as the item and click OK.

6. Window will come up asking for name.Enter Employee.xsd under File Name and click OK.Copy and paste below code snippet in your xsd file and save it.

7.Your schema will look something like this.

8.Now we will create two jms adapters one for consuming message and other for producing the jms message.Drag and drop JMS Adapetr from component pallette on exposed services lane.

9. JMS adapter config wizard will open up.Click next.

10. Give "ConsumeMessage" as service name and click next.
 11. In the next window we have to select JMS provider. Its weblogic server in our case so slect the same and move further.

12. Next we have to select the application server connection where our JMS queue is residing. If you dnt know how to create application server connection click Here:

13. Next window we need to define the adapter interface.We will be using the XSD that we created earlier for our purpose.So leave it as it is and move next.
 14. Since we are consuming message from jms queue select consume message as operation type and click next.
 15. Next window we are expected to mention destination name(queue in our case) and JNDI name for connecting to our destnation.
 16.Click on Browse button next to Destination Name to select our queue. Under jms module select "RequestQueue" and click ok.
 17.In the JNDI name mention the JNDI of our outbound connection pool that resides on Weblogic server Console.To check the JNDI name login to weblogic console and click on Deploymenys --> JMS Adapter --> Configuration --> Outbound Connection Pools --> Expand "oracle.tip.adapter.jms.IJmsConnectionFactory" and check your JNDI in our case its "eis/wls/Queue".
 18. Click next and in this window we will specify the schema for the format in which our composite will expect the input paylaod.Click on torch button and browse for Schema.


 36.Create variable window will pop up.Leave the default name and click OK.


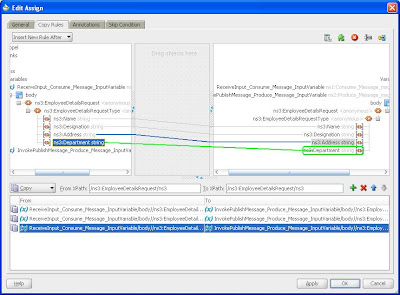
44. Double click assign and expand receiveinput variable on the left side and the invoke input variable on the right side.Map name on the left side to the name on the right side.

45. Similarly map all other remining elements from left hand side to right hand side one to one.Final Assing activity will look like this.Click Ok.
47. Save all and our BPEL will look like this.

48. Its time for evaluation of our efforts guys that we had put in so far.Lets deploy our baby and test it.Right click JMS Labs --> Deploy --> JMSLab.

49. I assume you guys have gone through "Hello World BPEL process" so will leave the explanation part of each module.select Deploy to application server click next.

50. Next.
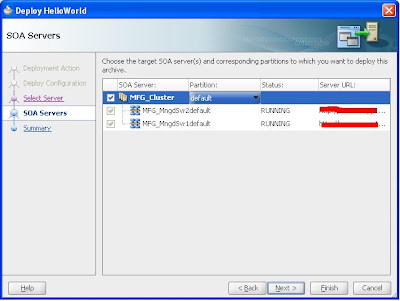
51. Select your application server and click next.
52. Select the partition and its default in our case click FINISH.
 53. Make sure our composite is successfully deployed by examing the Deployment logs in JDev.

54. Time to test our SOA composite.Remember we have designed our composite that will consume message from one jms queue and publish it to respone jms queue.Now we will publish one sample jms message in our RequetQueue for testing our composite.Login to weblogic server console.
 55. Under JMS Modules.Scan down to "RequestQueue" and click it open.

56. Click on monitoring tab once queue opens up.Notice the numbers under "Consumers Current". If its more than 1 (2 in our case) means our composite is deployed fine and is expecting messages on this requet queue.Guys dont get confused here by looking at 2 queue.It all depends how many managed servers your cluster have.If you have 2 managed servers 2 queues will show here 3 for 3 and so on.Just chill and concentrate on our testing part.

57. Click on the one of the queue and click show messages.

58. Click NEW tab to create new message in this queue.

59. Copy and paste below sample XML in text box and press OK.
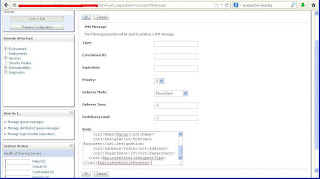
60. You will see JMSmessage sent successfully.

61. Now open up EM and drill down to default partition under SOA tab and click on oyr composite JMSLab.You will see one instance created over there.Click on instance ID to check the flow trace.


Today we will learn the concept of JMS adapter in SOA Suite.Oracle JCA Adapter for JMS (Oracle JMS Adapter), enables an Oracle BPEL process or an Oracle Mediator component to interact with JMS.While working with JMS adapter we can use either topics or queues.
Messages are exchanged through a queue via point to point interaction wheres as in topics the publish-subscribe model is being used i.e messages are sent to a topic and can be read by many subscribed clients.We will implement one usecase scenario in which our BPEL process will pick message from one jms queue and the same message will be published in another JMS queue.This scenario will demonstrate how to consume and publish messages in jms queue.Ofcourse, our queues would be present on weblogic application server.Also,knowledge about queues and connection factory by viewers is preasumed.
Before we start below are some prerequisites in order to implement this usecase:
1. Oracle JDeveloper 11G
2. Oracle SOA Suite 11G
3. Weblogic Server Up and running
I have done this tutorial using Oracle Soa Suite 11.1.1.6.0 , JDeveloper 11.1.1.6.0 and Weblogic Server 10.3.6.0.
Consume Message : The Consume Message option enables the adapter to consume (receive) inbound messages from a JMS destination.
Produce Message : enables the adapter to produce (send) outbound messages for a JMS destination.
Request/Reply : Oracle JMS Adapter supports both synchronous and asynchronous request reply interaction pattern.It is out of context from our tutorial perspective.
Lets start with the tutorial
1. We will use the same application "SOALabs" for this(refer Hello World BPEL Process) and create a new project in this application.First of all go to Files --> New. Then navigate to Projects under categories on left hand side and select SOA Project and click OK.

2. Window will ask you for project name.Give the project name as JMSLab and click next.

3. Select "Empty Composite" as composite template and finish.

4. Payload will be published in a JMS queue in a specific format.That format we will design using XML Schemas(XSD).For our application we will be using same schema both for consuming message from jms queue as well as producing message onto jms queue.Right click on xsd folder under project navigator and click New.

5. Select XML Schema as the item and click OK.

6. Window will come up asking for name.Enter Employee.xsd under File Name and click OK.Copy and paste below code snippet in your xsd file and save it.
<?xml version="1.0" encoding="windows-1252" ?>
<xsd:schema xmlns:xsd="http://www.w3.org/2001/XMLSchema"
xmlns="http://xmlns.example.com/EmployeeDetails"
targetNamespace="http://xmlns.example.com/EmployeeDetails"
elementFormDefault="qualified">
<xsd:element name="EmployeeDetailsRequest">
<xsd:complexType>
<xsd:sequence>
<xsd:element ref="EmployeeDetailsRequestType"/>
</xsd:sequence>
</xsd:complexType>
</xsd:element>
<xsd:element name="EmployeeDetailsRequestType">
<xsd:complexType>
<xsd:sequence>
<xsd:element name="Name" type="xsd:string" minOccurs="0"/>
<xsd:element name="Designation" type="xsd:string" minOccurs="0"/>
<xsd:element name="Address" type="xsd:string" minOccurs="0"/>
<xsd:element name="Department" type="xsd:string" minOccurs="0"/>
</xsd:sequence>
</xsd:complexType>
</xsd:element>
</xsd:schema>

7.Your schema will look something like this.

8.Now we will create two jms adapters one for consuming message and other for producing the jms message.Drag and drop JMS Adapetr from component pallette on exposed services lane.

9. JMS adapter config wizard will open up.Click next.

10. Give "ConsumeMessage" as service name and click next.


12. Next we have to select the application server connection where our JMS queue is residing. If you dnt know how to create application server connection click Here:


19. Drill down to Employee.xsd and select EmployeeDetailsRequest as element and click ok.

20. Click Next and finish.

21. In the same way drag and drop one more jms adapter to External References lane this time.
22. Provide service name.

23. Follow steps 11 to 13 again for next 3 windows that will come up.Next window will be prompting for Operation Name.This time select Produce Message and click next.

25. In the same fashion like we did for our inbound jms adapter, select the queue name (ResponseQueue in this case) and JNDI.Click next.

26. Again select the same schema --> EmployeeDetailsRequest then next and finish.

27. Now Drag and drop BPEL process from component pallette under components section in composite.xml.Window will pop up for creating BPEL process.Change the name of BPEL process to "BPELProcess" and select template as "Define Interface Later".Leave rest of the settings as default.Click OK.


28. We have configured two jms adapters and one BPEL process uptill now and the resulting composite will look like this.

29. Now, we will wire both the jms adapters with our BPEL process. Just drag the right arrow from ConsumeMessage adapter and drop it onto BPEL process.

30. In the same fashion drag the left arrow from ProduceMessage adapter and drop it onto BPEL process.

31. Our composite will look like this.Save all.

32. Lets start with the coding part now.Double click the BPEL process.BPEL design will be empty.Now drop receive activity from components pallette between two circles as shown in the screenshot.

34. After that wire the receive activity to partner link to its left i.e consume message.

35.Pop up will show up to edit the receive activity.Change its name to ReceiveInput and click on "+" sign next to Variable tag.


37.This variable will recieve the input from the inboun jms adapter and the created variable is of that adapters type only.Make sure you "check" the create instance section.It is required to instantiate our BPEL process when we will test it.Cleick OK.

38. Drag and drop invoke activity after receive activity in BPEL designer.Invoke activity enables you to specify an operation you want to invoke for the service (identified by its partner link). The operation can be one-way or request-response on a port provided by the service. You can also automatically create variables in an invoke activity.

39.Wire it to the partne link on the right side.

40. Window will open up for editing invoke activity.Same way we did for receive rename it and create the input variable.


41. Invoke activity will appear like this after ceration of input variable.This variable will be hold the output message payload and will publish its content in response jms queue.

42. So far so good.Our BPEL code will look like this.

43. Now we need to populate the input variable of the invoke activity by using the input paylaod.Assing activity will be used for this purpose.Drag and drop one assign activity between recieve and invoke activity.

44. Double click assign and expand receiveinput variable on the left side and the invoke input variable on the right side.Map name on the left side to the name on the right side.

45. Similarly map all other remining elements from left hand side to right hand side one to one.Final Assing activity will look like this.Click Ok.

47. Save all and our BPEL will look like this.

48. Its time for evaluation of our efforts guys that we had put in so far.Lets deploy our baby and test it.Right click JMS Labs --> Deploy --> JMSLab.

49. I assume you guys have gone through "Hello World BPEL process" so will leave the explanation part of each module.select Deploy to application server click next.

50. Next.
51. Select your application server and click next.
52. Select the partition and its default in our case click FINISH.
 53. Make sure our composite is successfully deployed by examing the Deployment logs in JDev.
54. Time to test our SOA composite.Remember we have designed our composite that will consume message from one jms queue and publish it to respone jms queue.Now we will publish one sample jms message in our RequetQueue for testing our composite.Login to weblogic server console.


<?xml version="1.0" encoding="UTF-8" ?>
<ns1:EmployeeDetailsRequest xmlns:ns1="http://xmlns.example.com/EmployeeDetails">
<ns1:EmployeeDetailsRequestType>
<ns1:Name>Karan</ns1:Name>
<ns1:Designation>Software Engineer</ns1:Designation>
<ns1:Address>India</ns1:Address>
<ns1:Department>IT</ns1:Department>
</ns1:EmployeeDetailsRequestType>
</ns1:EmployeeDetailsRequest>

60. You will see JMSmessage sent successfully.


62. In flow trace click on BPELProcess to open up the message flow.

63. Message has been successfully picked and published to response JMS queue.

64. Now go back to weblogic console and open up ResponseQueue to check if message is there or not.

65. Click Show messages and Click on ID tab in the table.


Bingo !!!its our message there.Message has been successfully published in the response queue.Pheeewwwww that was so tedious work but as long as result is fruitful, shouldn't bother you.So Guys today we learnt how to use the consume and produce operations of a JMS adapter.I hope that you guys are able to understand as i tried to cover all the steps and tried to implement it with precision.Still any doubts ,post it in here or mail it to me.
Ill be more than happy to help you.Stay tuned in for my next blog.
Ill be more than happy to help you.Stay tuned in for my next blog.
Cheers,
Thanks for posting!
ReplyDeleteThanks Buddy!!
ReplyDeleteGlad you guys found it useful....
ReplyDeletevery useful please keep it up... thanks
ReplyDeleteHello,
ReplyDeleteI created simple application by using JMS Adapter. The weblogic server can able to send JMS messages successfully. But the instance is not generated in emconsole.
Please provide your suggestions
Regards,
Mithun
Hi Mithun,
DeleteAre you able to see consumers on your request queue on weblogic server ?? It can be seen under "Consumers Current". Its value should be 1. Please verify.
Regards,
Karan
#in Step 16 "select our queue. Under jms module select "RequestQueue"
ReplyDeleteI do not see this JMS Queue in my list. what i'm missing?
I have WLS +SOA
Have you created jms queue on weblogic console ??
DeleteHi Karan,
ReplyDeleteThanks a lot for this step by step guide
Few questions –
1. I was getting “Non Recoverable System Fault :Exception not handled by the Collaxa Cube system. an unhandled exception has been thrown in the Collaxa Cube system” error , after googling I found it’s a bug – “This is an issue which has been identified by Oracle. The bug 12621337: ORA-01438 ON LIVE_INSTANCES COLUMN”.Is it due to some misconfiguration in JMS set up or something else.
2. I was not getting Queues in point 16 as above , “Queues under jms module”- After checking internet got this link - https://blogs.oracle.com/soaproactive/entry/how_to_create_a_simple , is this what you meant in your comment or there is some other way to configure it? , I used the B2B_IN_QUEUE and B2B_OUT_QUEUE and went ahead with next steps
3. Instance state was missing, Though the o/p message was present in output queue.( i have the snap shot but could not attach it here)
4. In flow trace all the stages are successful.
5. Tried to post again but still the instance state was still missing.( i have the snap shot but could not attach it here)
Pallab
Hi Pallab,
ReplyDelete1. when are you getting this exception ?
2. Yes, you have to create the jms queue first. In my case I already had the queue and dint show here how to create a jms queue. You can follow the link you shared to create jms queue and that should do it. Dont use B2B queues, those are internal to SOA
3. Instance state means Completed or Faulted you mean I assume. It should be there, as yuo dont have to do any other setting explicitly for that. Try creating separate queues and test again.
Let me know in case of any issues.
Regards,
Karan
Hi Karan,
ReplyDeleteI got the exception when i posted the message and verifying instance in EM. I will create the new queue and will tell you the results
Pallab
Hi how to consume one particular message from queue if there is 100 messages r there in that queue.?
ReplyDeleteHi Raju,
DeleteYou can use the concept of "message selector" while configuring JMS adapter. It will consume only message that will satisfy the condition there in the adapter.
Pls read this : http://docs.oracle.com/cd/E23943_01/integration.1111/e10231/adptr_jms.htm
Regards,
Karan
Hi,
ReplyDeleteConsumers current is showing 0. Please let me know where to look for the issue. It's on load balancing. Thanks in advance.
Hi karan,
ReplyDeleteI successfully deployed the above scenario, but it's showing only 1 in consumers current tab, pls reply me how to resolve this issue...Thank you..
Hi Krish,
DeleteHow many managed servers are there in your domain where you have implemented this ??