Monday, July 1, 2013

Saving Preference Variables Permanently - SOA Suite 11G

Hi All,

I would like to share one very useful information today related to preference variables in SOA 11G. Sometimes,you might have observed that you have changed the value for a preference variable but,after server restart it somehow got revert back to its original value. Weird isn't it !!!

Solution to this problem is very simple.

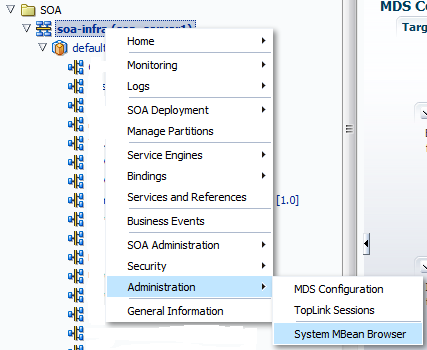
Step1: Just right click on SOA infrastructure and navigate to Administration --> System MBean Browser.
Step2: Then go to Application Defined MBeans --> oracle.soa.config --> Server: soa_server1 --> SCAComposite --> <your SOA composite> --> SCAComposite.SCAComponent and open up the BPEL Component.

Step3: In the BPEL just make required changes to the value of your preference variables and click Apply.

Step4: After that in the MBean configuration only,navigate to Operations tab and then click on save.

Step5: In the next window that opens up,click on Invoke.

Here you go the values of your preference variables are saved permanently.even after the server restart the new value will still persist.If you guys dont know how to set/get preference variable values you can check my post

Hope this post helped you guys.

Happy Learning,
Cheers !!!


Dynamically passing JNDI name to JCA Adapters - SOA 11G

Hi All,

We can pass the JNDI name to any JCA adapter (JMS,DB,File) at runtime as well.All we need to do is configure one property inside the invoke activity that will pass jndi at runtime to the JCA adapter.Just go to the source of your invoke activity where you need to pass the jndi at runtime.

 Then inside the invoke activity add below line:
<bpelx:inputProperty name="jca.jndi" variable="jndiVar"/> in case of BPEL 1.1 and <bpelx:toProperty name="jca.jndi" variable="jndiVar"/> in case of BPEL 2.0 where "jndiVar" is a variable that will contain your jndi name that will be passed at runtime.
Now assign the value to "jndiVar" and place this assign activity before the invoke activity where dynaic jndi needs to be passed.
Deploy and test your composite to verify that jndi is being passed dynamically at runtime.

NOTE: you won't be able to see this property under Invoke --> Properties tab. You have to add it manually by going inside the source of your BPEL process.

Hope it will help you in your implementation.

Happy Learning,
Cheers !!!

Thursday, June 20, 2013

Getting and Setting JMS Header Properties - SOA 11G

Hi Guys,

Sometimes there is requirement where you are required to set some JMS header values and then send the jms message to the client or consumer may interact with you via jms queue and sends some user defined properties in the JMS header.In BPEL 11G, we can easily set or retreive these values.

Setting JMS Header Values


Step1: Click on the invoke activity inside your BPEL process that is calling your JMS adapter for publishing messages in the jms queue.Then click on the source tab of BPEL.
Step2: Inside the invoke activity code add this property <bpelx:inputProperty name="jca.jms.JMSProperty.propertyname" variable="variablename"/>
where propertyname: name of the property you want to set and variablename: variable from which you are passing value to this property.For instance,in out usecase I am setting following properties:

      <bpelx:inputProperty name="jca.jms.JMSProperty.MSG_ID" variable="TransID"/>
      <bpelx:inputProperty name="jca.jms.JMSProperty.FROM_SYSTEM" variable="FROM_SYSTEM"/>   
      <bpelx:inputProperty name="jca.jms.JMSProperty.ServiceName" variable="ServiceName"/>

Make sure you populate all these properties before calling invoke activity,otherwise these properties will contain null/blank values.

Step3: Deploy and test your code.Verify that these values are getting set by looking into the flow trace of your composite.
Step4: Also,you can verify the message in jms queue as well and see if the properties are properly set or not.

Getting JMS Header Values


Step5:Inside your BPEL process,click on the receive activity that is receiving input from the jms adapter and click on source.

Step6: Add this property inside your receive activity: <bpelx:outputProperty name="jca.jms.JMSProperty.propertyname" variable="variablename"/>. It is same as we did for setting the property except the outputProperty tag.In my example, I am retreiving the value of jms header that I set previously.

      <bpelx:outputProperty name="jca.jms.JMSProperty.MSG_ID" variable="TransID"/>
      <bpelx:outputProperty name="jca.jms.JMSProperty.FROM_SYSTEM" variable="FROM_SYSTEM"/>   
      <bpelx:outputProperty name="jca.jms.JMSProperty.ServiceName" variable="ServiceName"/>

     
Create the variables that will store the values of these properties.

Step7: Deploy your code and test your composite.Inside flow trace verify you are able to retreive the jms properties headers value from the JMS message.
In this way you guys can set and get the header properties of any JMS message in SOA 11G.Apart from accessing these values from BPEL,you can also access these values from Mediator.In mediator, they are accessed in the assign step using:

Inbound: $in.property.jca.jms.JMSProperty.<propertyname>
Outbound: $out.property.jca.jms.JMSProperty.<propertyname>

Hope this post of some help to you.

Happy Learning,
Cheers !!!


Wednesday, June 19, 2013

Difference between BPEL 1.1 and BPEL 2.0

Hi Guys,

In my project there was a requirement to work with BPEL 2.0.I had experience of working with BPEL 1.1 only so it was something new for me.There are some minor differences in both the two.I will explain the basic differences between them

  • FlowN activity in BPEL 1.1 is replaced by <forEach> activity which can be invoked both serially and parallel.
  • RepeatUntil activity is added. Use this activity if the body of an activity must be performed at least once. The XPath expression condition in the repeatUntil activity is evaluated after the body of the activity completes. The condition is evaluated repeatedly (and the body of the activity processed) until the provided boolean condition is true.(Same as do while in programming languages).
  • The switch activity in BPEL 1.1 is replaced by <if> <elseif <else> activity in BPEL 2.0.
  • Terminate activity is chqanged to Exit Activity.
  • CompensateScope activity added - This activity enables you to start compensation on a specified inner scope that has already completed successfully. This activity must only be used from within a fault handler, another compensation handler, or a termination handler.   
  • A new activity Rethrow has been added to fault handlers.This activity enables you to rethrow a fault originally captured by the immediately enclosing fault handler.
XPath expressions are simplified by using the ‘$’ notation for variable access in BPEL 2.0, for example, $inputVariable.payload/ns1:firstname.

  • In BPEL 2.0, if you are working with synchronus BPEL process and in the BPEL code you have not used reply activity to send bcak the response.You will get below error where as, in BPEL 1.1 no error occurs.
 
These are the main differences in terms of process flow and new/modified activities. For more information you guys can refer below links:
Hope this helps you.Guys please do share your comments as well,if you find any of my post useful.

Happy Learning.
Cheers !!!
Tuesday, June 18, 2013

Composite Sensors in SOA Suite 11G

Hi Guys,

Its been long since I last wrote blog because of some workload.Eventually took out some time to continue sharing my knowledge.Without wasting any time, Ill start and explain you guys about Composite levels , what are they used for and how to use them.

Composite sensors
provide a method for implementing trackable fields on messages. Composite sensors enable you to perform the following tasks:

  •     Monitor incoming and outgoing messages.
  •     Specify composite sensor details in the search utility of the Instances page of a SOA composite application in Oracle Enterprise Manager Fusion Middleware Control. This action enables you to locate a particular instance.
  •     Publish JMS data computed from incoming and outgoing messages.
  •     Track composite instances initiated through business event subscriptions.

You define composite sensors on service and reference binding components or on service components that have business event subscriptions in Oracle JDeveloper. This functionality is similar to variable sensors in BPEL processes. During runtime, composite sensor data is persisted in the database.

In our use case I have created a One Way BPEL process exposed as web service using below schema:


<?xml version="1.0" encoding="windows-1252" ?>
<xsd:schema xmlns:xsd="http://www.w3.org/2001/XMLSchema"
            xmlns="http://www.example.org/Employee"
            targetNamespace="http://www.example.org/Employee"
            elementFormDefault="qualified">
<xsd:element name="employee" type="personinfo"/>
<xsd:complexType name="personinfo">
  <xsd:sequence>
  <xsd:element name="EmpID" type="xsd:string"/>
    <xsd:element name="firstname" type="xsd:string"/>
    <xsd:element name="lastname" type="xsd:string"/>
  </xsd:sequence>
</xsd:complexType>
</xsd:schema>

Inside the BPEL process  we only have receive activity.Our BPEL process will accept the fields defined in schema and thats all we require for this post. 

Step1: To create sensors ,Click the Composite Sensor icon above the SOA Composite Editor
Step2: Composite sensors window will pop up.Click on "+" icon to create composite sensor.
 
Step3: In the next window, give the name to sensor and define expression to assing value to this sensor.
Step4: You will see the input payload only in our usecase as our BPEL process is one way only.Drill down to Employee ID and click OK.
Step5: Now under sensor actions you will see two options Enterprise Manager and JMS Queue. 
  • Enterprise Manager
Select to make runtime sensor data searchable in the Instances tab of a SOA composite application in Oracle Enterprise Manager Fusion Middleware Control.
  • JMS Queue
Select to store composite sensor data (XML payload) in a JMS queue. You must specify the JMS connection factory and queue name.In our case we will use Enterprise Manager
Step6:Our Composite sensor EmployeeID is created .Click OK.
Step7: Under your projects on left hand side you can see two new files getting created sensor.xml and sensorActiuon.xml. These files contains list of all the sensors configured for particular composite and along with their actions.
Step8: Compile and deploy your code to EM and test the Sensors composite.Pass the values in employeeid,Fname and Lname.
Step9: Now Open up flow trace for the request you triggered.Expand the sensors tab just below Flow Trace.You will see EmployeeID as sensor and its value that we passed in the input.
Step10: Go back to your Composite in EM and go to Instances tab.Just next to Search,Reset Buttons you will see a new button :AddFields. Click on that and select EmployeeID.

Step11: New search field "EmployeeID" will be added in the Search box along with all other existing search criterias.In this way you can search your instances by passing employeeID field value.
Composite sensors are very important from support and operations point of view as we can set custom search fields using which we can search for our composite instances.
For more imformation you can refer this LINK.

Hope you guys enjoyed the blog.

Happy Learning,
Cheers

Monday, May 27, 2013

Oracle Database Adapter in SOA 11G Tutorial

Hi Everyone,

I'll be demonstrating Oracle Database Adapter in today's tutorial.Oracle JCA adapter for DB enables a BPEL process to communicate with Oracle databases or third party databases through JDBC. The Oracle Database Adapter service is defined within a BPEL process partner link by using the Adapter Configuration Wizard of Oracle BPEL Process Manager (Oracle BPEL PM).

There are number of operations avilable that you can perform with DB adapter namely :


  • Call a Stored Procedure or Function :Select this option if you want the service to execute a stored procedure or function.

  • Perform an Operation on a Table: Select this option for outbound operations. You can select Insert or Update, Insert Only, Update Only, Delete, Select, or any combination of the six. 

  • Poll for New or Changed Records in a Table:  Select this option for an inbound operation (that is, an operation that is associated with a Receive activity). This operation type polls a specified table and returns for processing any new rows that are added. You can also specify the polling frequency.
  • Execute Pure SQL: Useful when dealing with arbitrarily complex statements, aggregate queries (result is not row-based), and XMLType columns.

Uscase Scenario: We will be using DB table for polling new records and updating the same table with some field.To execute thiw we will use one inbound DB adapter,polling for new records.One outbound adapter for updating records in a table.BPEL process that will contain our process logic.


Before starting the lab,I would like to explain dirrerent types of files that are being created while configuring DB adapter
  1. <serviceName>.wsdl: This is an abstract WSDL, which defines the service end point in terms of the name of the operations and the input and output XML elements.
  2. <serviceName>_table.xsd: This contains the XML file schema for these input and output XML elements. Both these files form the interface to the rest of the SOA project.
  3. <serviceName>_or-mappings.xml: This is an internal file. It is a TopLink specific file, which is used to describe the mapping between a relational schema and the XML schema. It is used at run time.
  4. <serviceName>_db.jca: This contains the internal implementation details of the abstract WSDL. It has two main sections, location and operations. Location is the JNDI name of an adapter instance, that is, eis/DB/SOADemo. Operations describe the action to take against that end point, such as INSERT, UPDATE, SELECT, and POLL. The contents of the db.jca file are wholly determined by choices made while running the Adapter Configuration Wizard.
  5. <serviceName>.properties: This is also an internal file. It is created when tables are imported, and information about them is saved. It is used only at design time.

At run time, the location is used to look up the adapter instance which executes the service. Based on the properties in the db.jca file and the linked or-mappings.xml file, <seviceName>.properties file generates the correct SQL to execute, parses the input XML, and builds an output XML file matching the XSD file. To execute the SQL, it obtains a pooled SQL connection from the underlying data source.


Lets start with the tutorial:

Step1: Create one sample table which will be used in our tutorial.I have created "TB_USERS" table and inserted some records in it.Kindly observe the value of "ReadFlag".Its significance will be discussed later on.
Step2: Drag and drop DB adapter from service adapters onto the exposed services lane
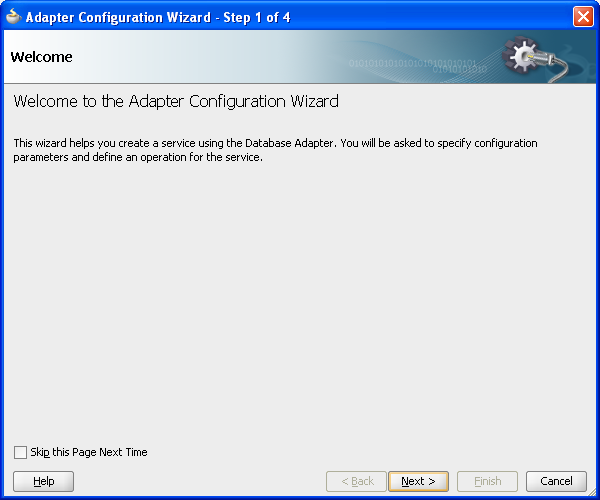
Step3: DB Adapter configuration wizard will open up.Click next.
Step4: Give the service name as "PollerDB".
Step5: In the next window give the connection details.I presumed you guys have already created a DB connection.If not,kindly create one and use here.
Step6: Select "Poll for New or Changed Records" as a operation type.It is an inbound operation which polls for new records in a table or whenever existing records are changed.
Step7: In next window,we will import our table from database.Click on import tables.
Step8: Search for your table using Name Filter and Query,and then move it to selected section by clicking on the arrow.
Step9: Our table will be imported and shown in next window.
Step10: DB adapter requires a primary key in a table to uniquely identify a row in atable.Since while creating table we haven't created any primary key,select "FName" as primary key and move next.
Step11: We are working on single table only.No need to define relationships,move next.
Step12: Select the database columns that you want to query from table.I have selected all of them.
Step13: Next window will ask you to choose an operation that will be performed when a record is read.Select Logical Delete option.This operation employs the logical delete polling strategy. This strategy involves updating a special field on each row processed and updating the WHERE clause at run time to filter out processed rows. It mimics logical delete, wherein applications rows are rarely deleted but instead a status column isDeleted is set to true. The status column and the read value must be provided, but the modified WHERE clause and the post-read update are handled automatically by the Oracle Database Adapter.
Step14: If you go back I have created one field "ReadFlag" in the table and given value as "N" for all the records.This field will act as logical delete field.DB adapter will poll for all records having unread value (N in our case) and after processing will update the value of this field to Read Value (P in our case) after successful read.
Step15: In the next window set the values for Polling frequency,DB Rows per transaction.Also check Distributed Polling as distributed polling is used to ensure that the same data is not retrieved more than once.
Step16: Next window no change is required .Click next.
Step17: Next.
Step18: Finish.We have configured our DB adapter for polling records from a table.
Step19: Now,to write records to the same table,drag and drop one more DB adapter this time to external references lane.Give the service name as "WriteDB".
Step20: Same way we did for polling adapter,choose DB connection and click next.
Step21: Under operation type,choose "Update Only" ,since we will update the value of FullName only without modification in other column values.
Step22: Import Table.
Step23: Define Primary Key.
Step24: Since we are going to update the value for "fullname" field only.Choose fullname and click next.
Step25: Next and finish.
Step26: Drag and drop BPEL component onto the components lane and choose Define Interface Later Template and finish.
Step27: Wire both polling adapter and adapter for writing records with BPEL by dragging and dropping wires to BPEL component.
Step28: Drag and drop receive activity and link it with Polling adapter partner link.Configure receive activity and create input variable for this activity.If you dnt know how to work with and configure receive activity ,kindly refer to my initial blogs.In that I have explained in detail about using receive activity.
Step29: Likewise,drag and drop invoke activity to invoke Write DB adapter.In the same way create input variable for invoking DB adapter.
Step30: As of now your BPEL process will look like this.
Step31: Now drag and drop assign activity between receive and invoke activity.We will populate the input variable for invoking DB adapter in this assign activity.Map the first name field from receive input variable to invoke DB adapter input variable.And for full name use expression builder to concatenate the Fname and lname from Input and map it with Fullname field of invoke DB adapter input variable.

Step32: Save all and deploy your composite on EM
Step33: We have set the polling frequency to 10 seconds,so after that interval out interface will poll for new records at regular interval.Click open one composite.
Step34: Observe the input payload that is received using pollign adapter and the invoke activity input variable for invoking the Write DB adapter.
Step35: Now to verify the records are also updated in table,go back to your DB and open up your table.Fullname column is populated with values and also observe the value of read flag "P". Now poller will not poll for any records anymore as no record exists with value "N".It will poll again when some new records are inserted in the database or existing records ReadFlaf value is set back to "N".
Thats it guys.Hope you guys have understood the concept ob DB adpater in Oracle SOA Suite 11G,its use and configuration.In the coming tutorial I'll be posting blogs on using other operations of DB adapter as well.

If you guys have any concerns,coubts or issues ,please feel free to contact me by commenting here or emailing me.I'll get back with the reply at earliest.Also,if you guys need blog specific to topic you want to undertand,I Will be happy to do that as well.Till then take care

Happy Learning,
Cheers